
Token exchanges are pretty much the heart of DeFi and there is no way around them, whether you just try out a DeFi protocol every now and then or whether you count yourself among the day traders … or even among the Degens (= Degenerated Traders). In this post I will first give you a brief introduction to Uniswap – the pioneer among Decentralized Exchanges (DEXs). Then we take a closer look at the revolutionary Automated Market Maker principle to understand the mechanics behind most DEXs. With this we will have the necessary basic knowledge to then dive into the two central user journeys of Uniswap: swapping tokens and providing liquidity in the Automated Market Maker pool. Have fun reading… and don’t forget to try it out for yourself!
What is Uniswap?
Uniswap is the pioneer among Decentralized Exchanges (DEXs) and was launched on Ethereum in 2018. As a DEX, Uniswap allows you to swap your tokens without a central custodian. To better understand what “without a central custodian” means, let’s first look at how the Centralized Exchanges (CEXs) such as Binance work as a comparison: If you use a CEX for swapping your tokens, then you have to first send your tokens from your own wallet to the wallet address of the CEX, which means that the CEX takes control of your tokens. Then you place a swap order on the CEX and after the swap is done you have to move the new tokens from the address of the CEX to your own wallet address so that you can technically take control of your tokens again. And as always with centralized institutions, things can go wrong here: E.g., what happens to your tokens handed over to the CEX if the CEX goes bankrupt… or if the CEX is hacked? “Not Your Keys, Not Your Coins!“, also applies here. With decentralized exchanges, this is fundamentally different, since like all decentralized apps they work as “non-custodial”. You can exchange your tokens directly from your wallet without first having to hand them over to a third party. To do this, you simply send your tokens from your own wallet to the address of the smart contact from Uniswap… et voilà… in return you will receive the desired tokens transferred into your wallet. It all happens in a single transaction and is completely transparent. The exchange rates are also algorithmically “burned” into the smart contracts transparent for everyone to see.
How big is Uniswap?
Regarding the Total Value Locked (TVL; note: The TVL is the total value in US dollars, which is stored in the corresponding smart contracts of the app; i.e. a kind of balance sheet total of the respective smart contract.) Uniswap belongs together with Curve to the two leading DEXs. See below for the current figures from DefiLlama. I decided to introduce Uniswap first and not Curve because you can trade pretty much any token imaginable (if someone provides the liquidity) on Uniswap, while Curve specializes in stablecoins.
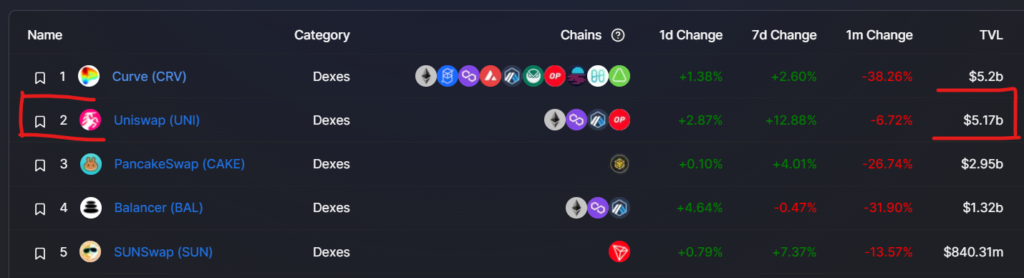
You can currently use Uniswap on the following four chains: Ethereum, Polygon (an Ethereum sidechain), Arbitrum and Optimism (both Ethereum Layer 2 chains based on optimistic rollups). (If you’re new to sidechains and rollups: Here you can find more information about these Ethereum scaling solutions.)
What is an Automated Market Maker?
The central mechanism behind Uniswap (and most other DEXs) is the Automated Market Maker principle. With this approach, there are no order books (i.e., no matching of buy and sell orders), but so-called liquidity pools. Liquidity pools are token pools (usually consisting of two token types), which are held by Uniswap’s smart contracts and with which users can exchange tokens. This means that with the DEX there is no peer-to-peer exchange of tokens as with the order book, but a peer-to-smart contract exchange. The user exchanges his tokens directly with the Uniswap smart contract. And the smart contract algorithm that determines the exchange rate is called an Automated Market Maker (AMM). This AMM is an ingenious invention of the DeFi world!
“Waaaay too abstract… I don’t get it!”, is what you’re probably saying now. OK, understood! Then let’s look at a concrete example: Let’s take the ETH-DAI liquidity pool as an example, via which users can exchange ETH and DAI. In our example, we assume a small pool with 10 ETH and 10,000 DAI. Uniswap’s AMM now sets the price for a swap order using the constant product method, which means that the AMM sets the price at a certain level so that the product between the number of ETH and the number of DAI in the ETH-DAI liquidity pool is constant before and after the transaction.
In our example with 10 ETH and 10’000 DAI in the pool, the constant product is 100’000 (=10*10’000). If a user now wants to buy 0.01 ETH, the AMM will charge him 10.01 DAI (=100’000/9.99-10’000) so that the product 9.99*10’010.01 equals the constant of 100’000 again.
If a user now wants to buy a larger amount of 0.1 ETH, the AMM calculates 101.01 DAI (=100’000/9.9-10’000) for this, so that the product 9.9*10’101.01 equals the constant of 100’000 again.
If the user now wants to buy an even larger amount of 1 ETH, the AMM will charge him 1’111.11 DAI. So, you see, the larger the amount of ETH that the user wants to buy, the higher the price per ETH that the AMM charges the user: When buying 0.01 ETH, the user pays a price of 1’001 DAI per ETH. When buying 0.1 ETH a price of 1’010.1 DAI is applied and when buying 1 ETH a price of 1’111.1 ETH is asked. This rising price for larger orders is called slippage.
This mechanism ensures that the liquidity pool can never be emptied. If a user wanted to buy up all 10 ETH in our ETH-DAI liquidity pool, the AMM would charge him an infinitely high price, which ensures that there is always ETH in the liquidity pool.
This price slippage makes perfect sense for the system as a whole, but for you as a DEX user it poses a certain risk, because when you send your swap order it is not 100% clear what price your swap will cost, because depending on the token quantities available in the liquidity pool at the time of your trade you will experience a larger or smaller slippage. The rule that applies is that the larger the number of tokens in the liquidity pool, the smaller the slippage. Therefore you should have an interest to swap your coins on the largest possible (or, in technical jargon, “the deepest”) liquidity pools.
And what is impermanent loss?
In the previous section we briefly touched on the risk of slippage that can occur when you make a larger swap in a shallow liquidity pool. If you don’t do a swap, but deposit your tokens in an AMM pool as a liquidity provider in order to participate in the swap fees, then you expose yourself to another risk: the so-called impermanent loss risk. Impermanent loss is the opportunity cost of depositing your tokens in a liquidity pool instead of keeping them in your own wallet.
It’s best if we take a quick look at this with a concrete example. In our example, the initial price is 1 ETH = 1,000 DAI. We now take 10 ETH and 10’000 DAI from our wallet in order to create an ETH-DAI liquidity pool with a constant factor of 100,000 on Uniswap.
Now let’s assume that the price of ETH doubles. So 1 ETH = 2’000 DAI applies. Thus, arbitrageurs will immediately buy the cheap ETH in our ETH-DAI pool until the price of ETH in our pool has risen to 2,000 DAI. This is the case as soon as the new token distribution of 7.07 ETH and 14’142.14 DAI is reached in the pool (7.07 = sqrt(100’000/2’000) and 7.07*14’142.14 = 100’000).
To calculate the resulting impermanent loss, we need to calculate the difference between the profit made by holding the tokens in the wallet and the profit by depositing the tokens in the liquidity pool:
- Profit by holding the tokens in the wallet = (10*2’000 DAI +10’000 DAI)-(10*1’000 DAI + 10’000 DAI) = 10’000 DAI
- Profit by depositing the tokens in the liquidity pool = (7.07*2’000 DAI +14’142.14 DAI)-(10*1’000 DAI + 10’000 DAI) = 8’282.14 DAI
This means that we would have made 1’717.86 DAI more profit if we had not deposited our tokens in the Uniswap liquidity pool, but simply left our tokens in our wallet.
Two additional comments on impermanent loss:
- The loss is not realized until you remove your tokens from the pool. It could be that the token ratio changes again in the other direction and thus cancels the impermanent loss again.
- The more the prices of the two tokens move apart, the greater the impermanent loss. This means it is smallest for stablecoin liquidity pools such as DAI-USDC pools.
Can I put tokens in the liquidity pool myself to earn passive income?
Absolutely! With DEXs like Uniswap, anyone can make their tokens available to the liquidity pools, giving the liquidity provider a proportional share of the swap fees. With Uniswap, for example, the user typically pays a swap fee of 0.30%, which is fully paid out to the liquidity providers. (Note: That’s crazy! 100% of the fees go to the liquidity provider and 0% go to the platform.) This means that as a liquidity provider you earn money with every swap in the liquidity pool. And the larger your share of the liquidity pool, the larger your share of the swap fees.
And one more thing: On Uniswap anyone can create any new liquidity pool for any token pair. The only requirement is that the token standard ERC-20 is used, which covers pretty much all tokens except NFTs.
Well, enough theory for now! Now let’s go through the concrete user journeys.
User Journey 1: Exchange tokens
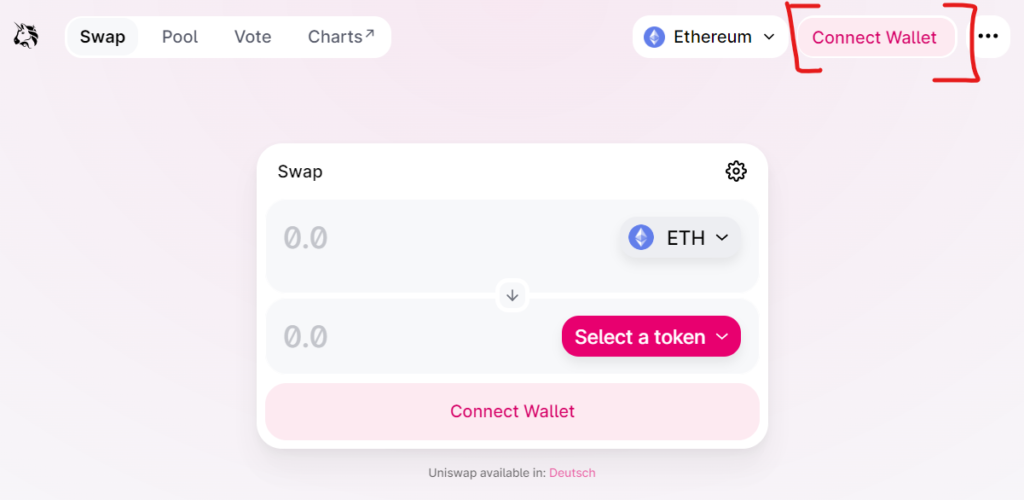
Step 1: Open the Uniswap interface via app.uniswap.org in your browser and click Connect wallet, to connect to your wallet (yep… no usernames and passwords on the web!).
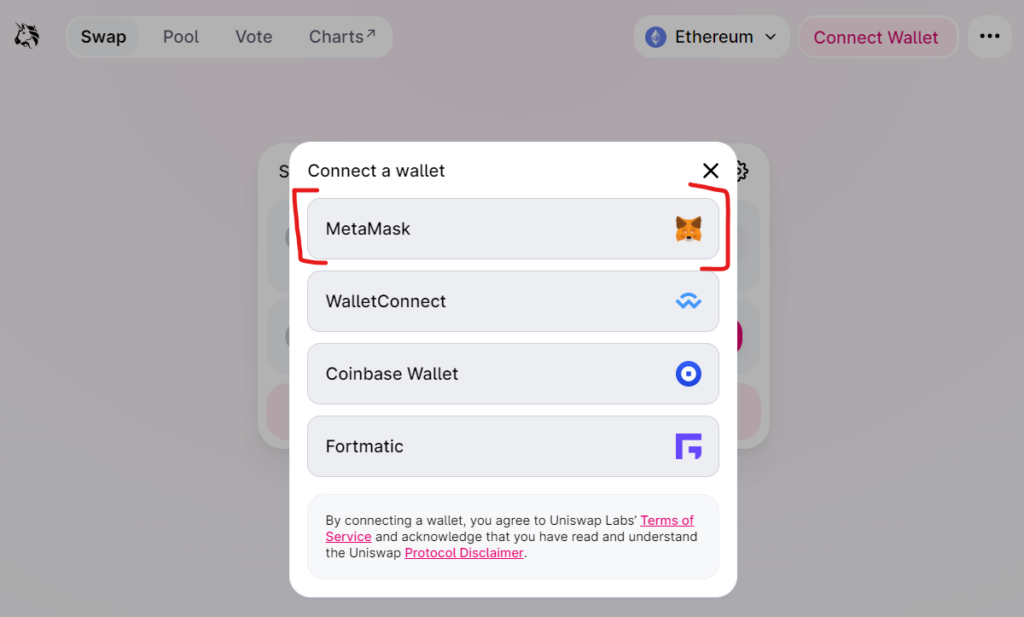
Step 2: As always in my examples, I choose my MetaMask wallet.
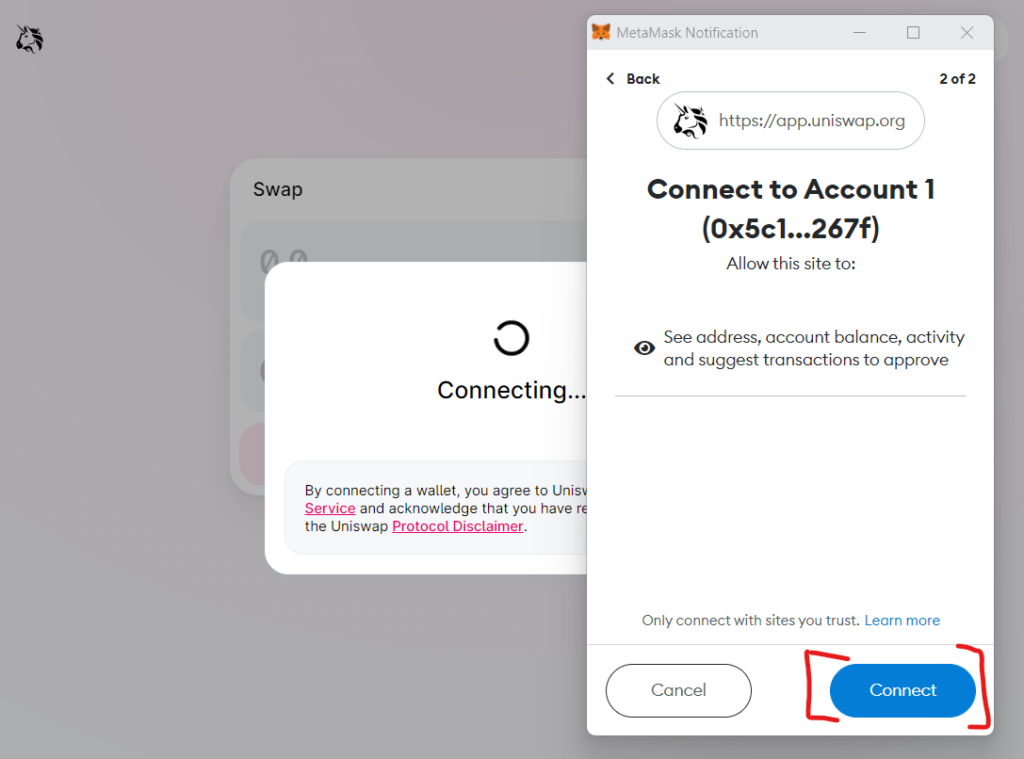
Step 3: Now allow Uniswap to connect to your wallet.
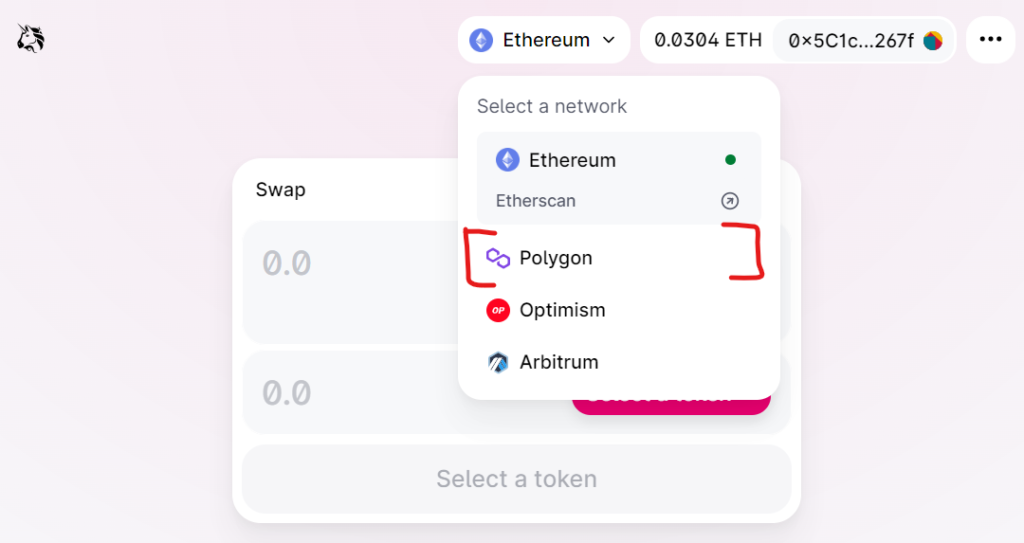
Step 4: The gas fees (i.e., transaction costs) are currently too high for me on Ethereum, so I’m switching to the cheaper Ethereum sidechain Polygon.
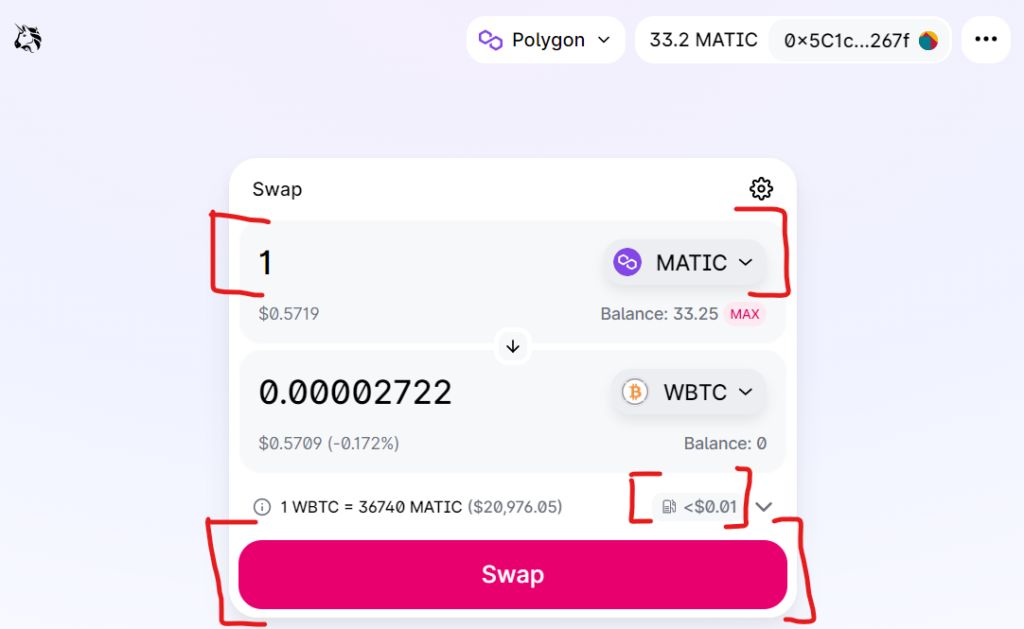
Step 5: Now we are on Polygon where we want to do our swap. We change a single MATIC coin, which is currently only worth around 0.5 USD, into a tiny fraction of a Bitcoin. This is economically possible because the transaction costs are less than 0.01 USD. Welcome to DeFi! Click now Swap.
Step 6: Next we confirm the transaction in the Uniswap UI.

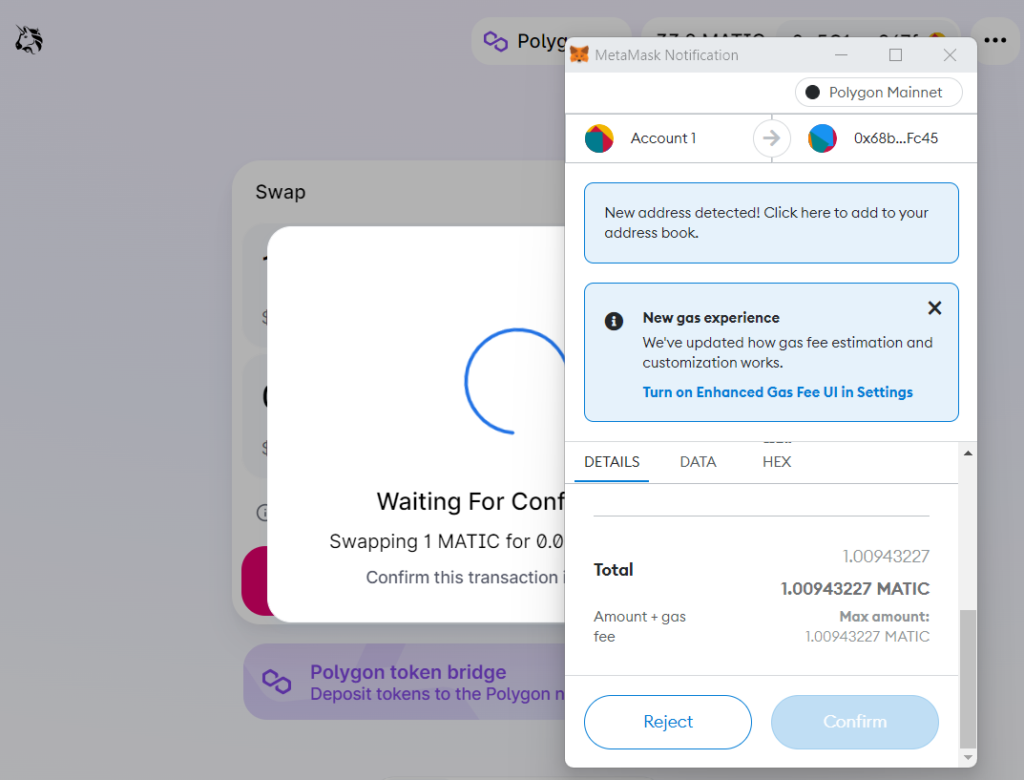
Step 7: And finally, we confirm the transaction in our wallet.
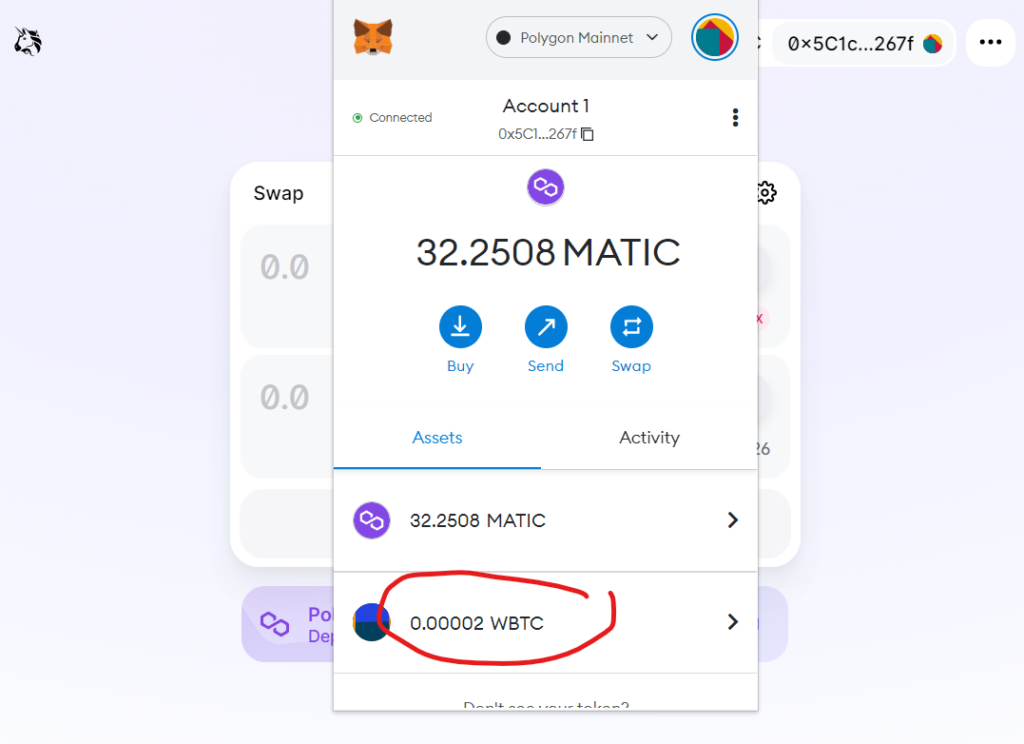
Step 8: That’s it. If we now open our wallet then we see that we now have a little less MATIC (about minus 1 MATIC) and a little bit of WBTC (about 0.00002 WBTC) in our wallet. I.e., our swap order was successfully executed on the Polygon chain.
User Journey 2: Deposit tokens in a liquidity pool to earn swap fees as a liquidity provider
Step 1: As in Journey 1, we first open the Uniswap UI and connect it to our wallet. See the screenshots in Journey 1 above.
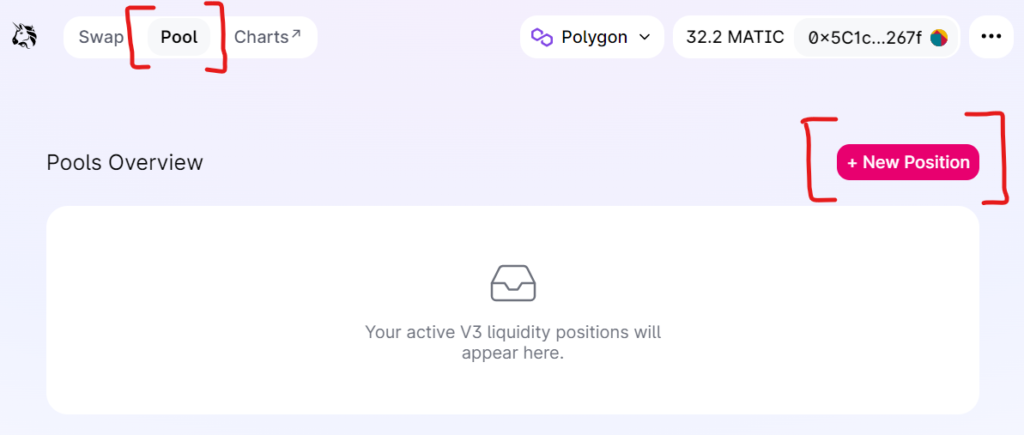
Step 2: Now let’s switch from the Swap UI (this is the default UI) to the Pool UI and then click New Position to create a new position in a liquidity pool.
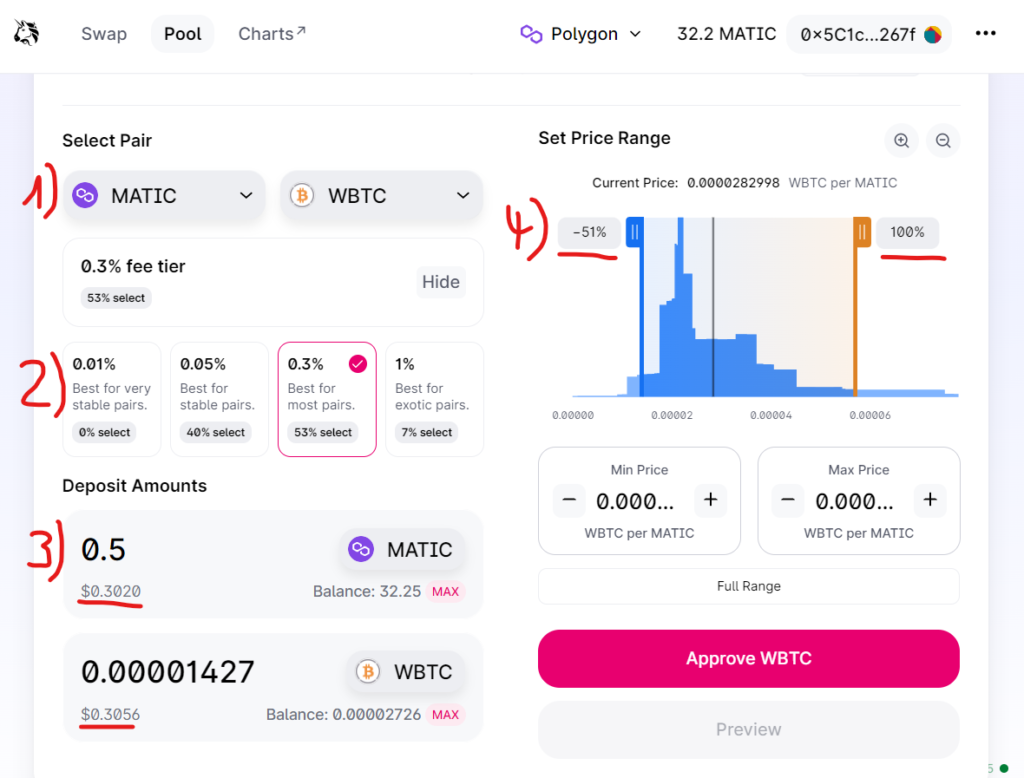
Step 3: Now it’s getting exciting. In this step we specify which tokens we want to deposit into which liquidity pool. Since we bought WBTC in Journey 1 above, we now want to use this WBTC to deposit it together with MATIC in the MATIC-WBTC pool. As you can see in the screenshot below, in 1) we choose the liquidity pool pair MATIC-WBTC. In 2) we choose the 0.3% fee tier (Note: With Uniswap you have the option to choose between four different fee tiers, whereby the users always swap in the lowest fee tiers and higher tiers are only used when the lower tiers are used up). In 3) we then choose the amount of MATIC tokens that we want to insert. As you can see, the system ensures that (almost) exactly the same amount of WBTC is inserted accordingly. This means that you always have to provide liquidity in such a way that you deposit the same dollar amount of both tokens. Under 4) we then determine the price range in which we want to provide liquidity. This means that you have the freedom to only make your liquidity available for certain price ranges. This principle is called “concentrated liquidity”. One consequence of this freedom of choice is that not every liquidity provider has the same liquidity position. Thus, liquidity providers do not receive fungible tokens (ERC-20) to represent their liquidity position but non-fungible tokens (NFT). Now click Approve.
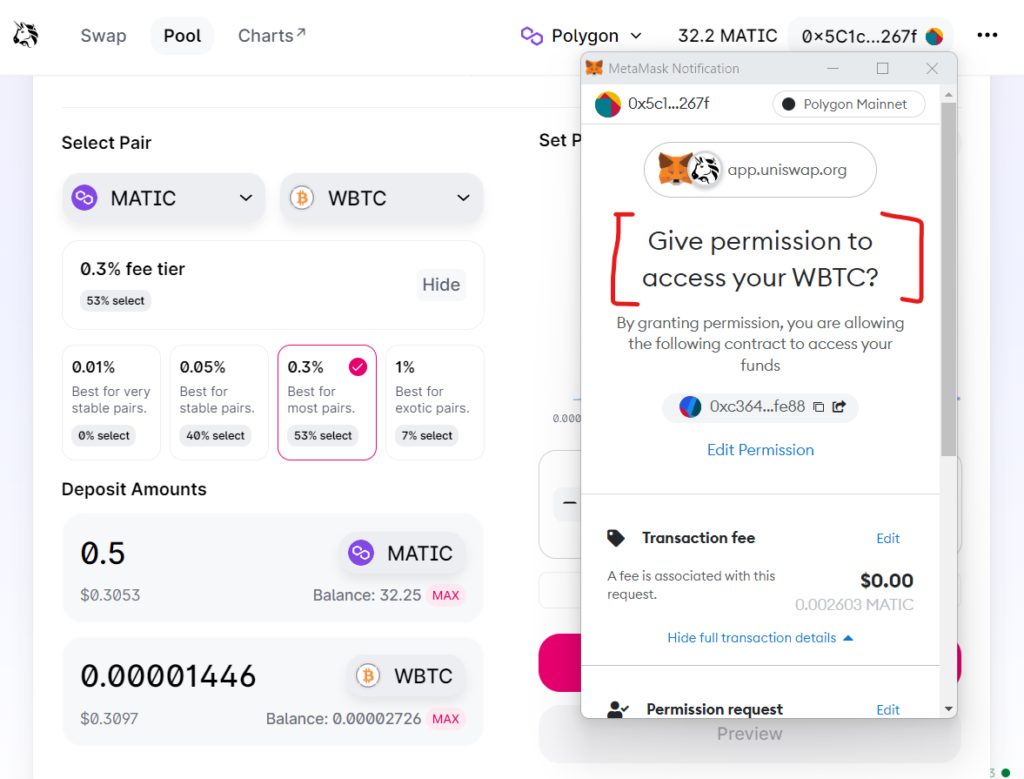
Step 4: The next thing we need to do is give the Uniswap smart contract permission to access our WBTC tokens to put them in the liquidity pool.
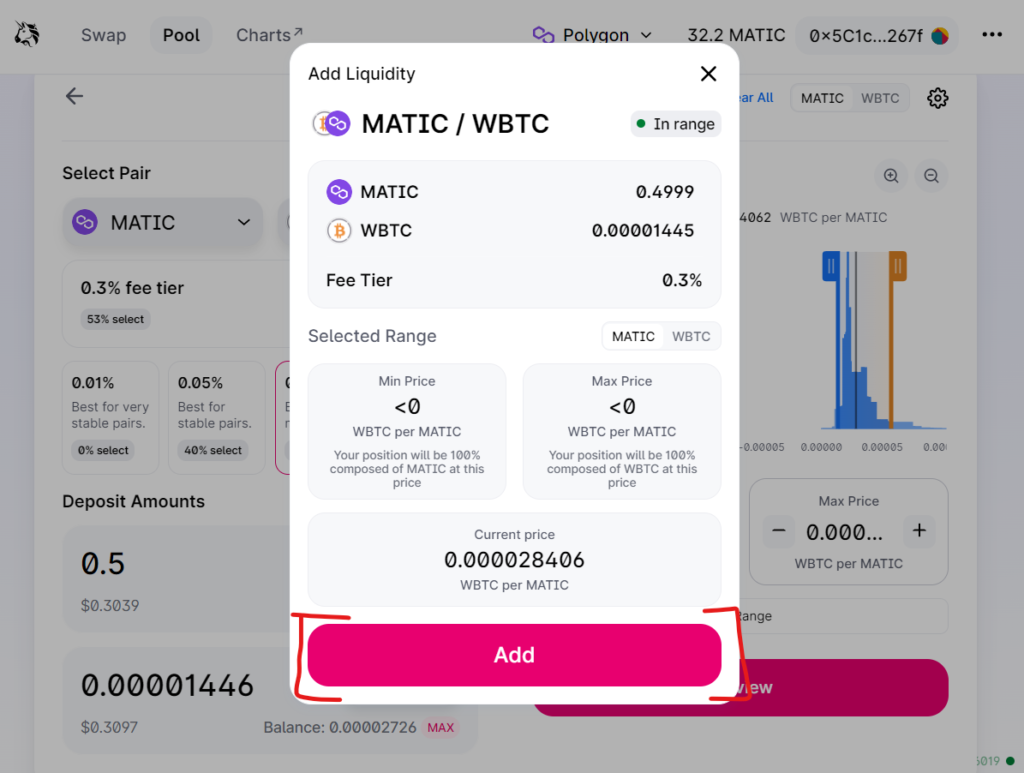
Step 5: We then receive the summary of the order in Uniswap, which we accept by clicking Add.
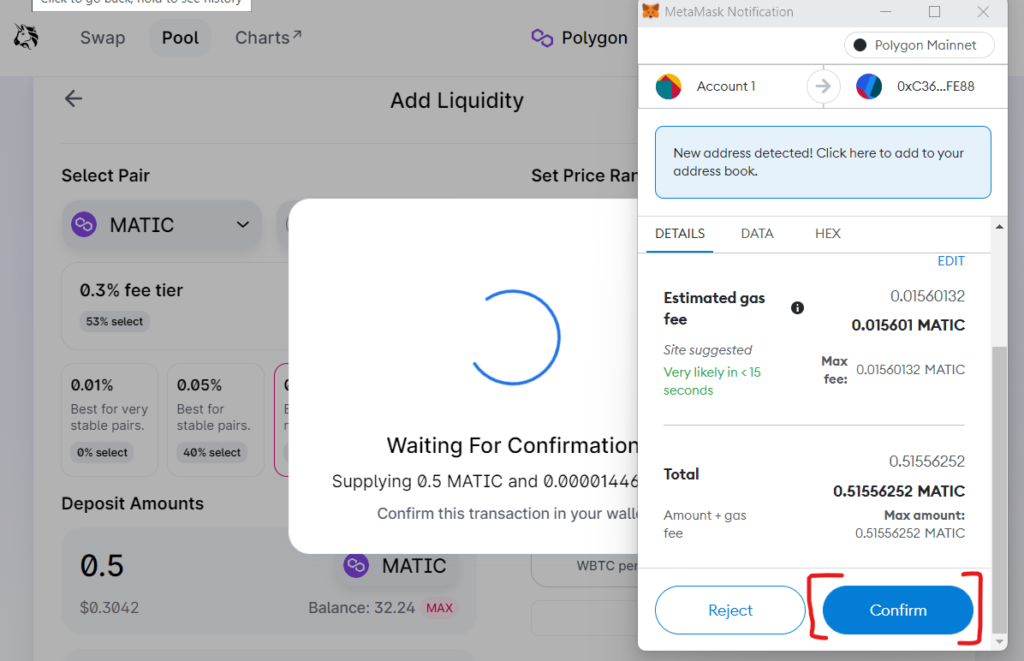
Step 6: As always we have to confirm the blockchain transaction in our wallet.
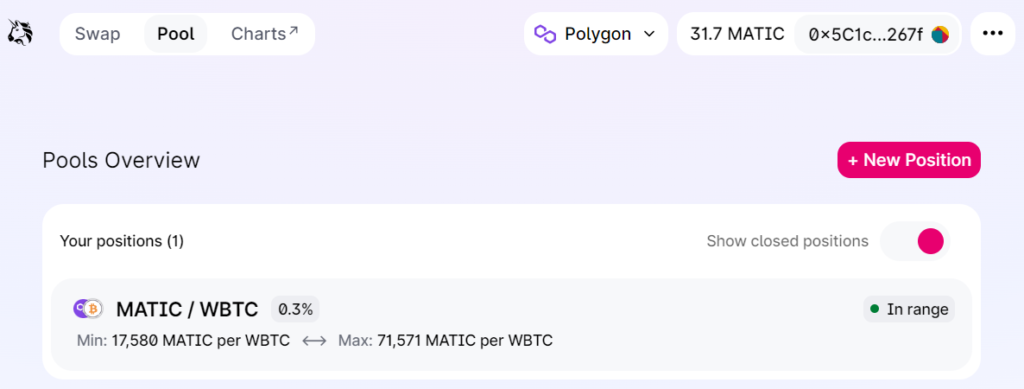
Step 7: We now see our new liquidity provider position in the Uniswap UI. From now on we continuously participate in the 0.3% fees of the MATIC/WBTC pool.
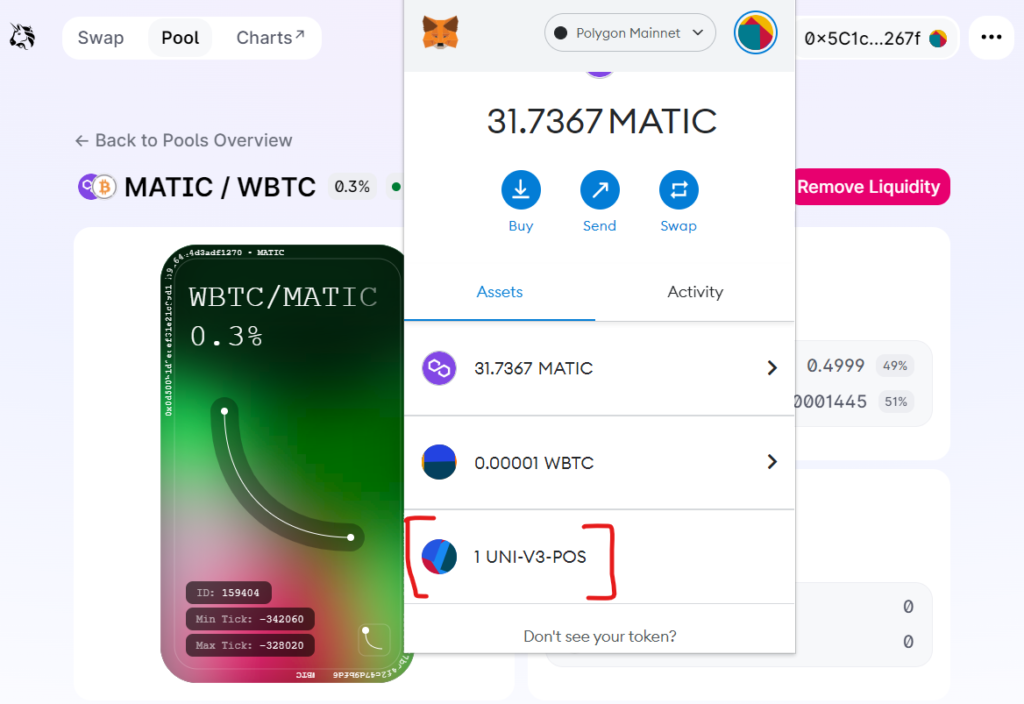
Step 8: We now see in our wallet that we received the newly generated UNI-V3-POS token. This means that our liquidity pool position has been tokenized, which means that we can continue to use it as we wish in the DeFi space (e.g., as collateral for a loan if a DeFi lending protocol accepts this token as collateral).
So, we have come to the end of the second Uniswap user journey. I hope that you were able to learn something… and above all that it was fun and encouraged you to try out the protocol yourself.
And by the way: In Module 5: Deep dive decentralized exchanges of my DeFi course “Fit for DeFi” I will show you in a video how you can use Uniswap most easily. Take a look at the video!